Archive for the ‘Software’ category

Concrete5 vs WordPress: Benchmarking Load Time

December 14th, 2010

I just discovered Concrete5 CMS recently when another developer in my area launched a site with it.  Always up for learning something new, I went to the website, read the sales pitch, and decided to give it a whirl.  Before I spend time learning yet another CMS, for kicks I thought I would benchmark it for speed against WordPress, my current go-to solution.  Here we go.

Preliminaries
Hardware: All tests will be conducted on my Desktop Computer; a custom built PC with a 3.5Ghz Core2 Duo, 4GB of Ram, and a 10,000 RPM hard drive.  Not identical, but similar to many server setups on the market.

Software: I’m running Ubuntu 10.04 with Apache 2.2, PHP 5.3, and MySQL 5.1.  Once again, apart from using a Desktop OS, this is almost identical to your usual LAMP server software. For benchmarking, I will be using Siege 2.68.

Step 1: Fresh Installs
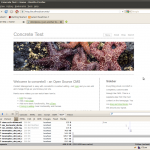
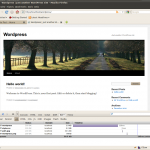
I downloaded and installed the latest version of Concrete5 (5.4.1.1) and WordPress (3.03)  Here are the screenshots of the home pages out of the box:

WordPress Fresh Install

Concrete5 Fresh Install

a

Step 2: Balancing
Okay, First thing, to be fair we need to balance the page weights.  Siege will not load all the linked resources (like CSS and Javscript), I actually only care about the html page weights.  Out of the box Concrete is 1771 bytes and WordPress is 2015 bytes.  Pretty close.  After removing several widgets from the WordPress sidebar (Those extra queries weren’t fair anyway) and adding the right amount of Lorem Ipsum, the WordPress page is now exactly 1771 bytes as well.  Perfect.

Step 3: Attack!
To stress test my desktop server I am using the following siege command:

 siege -c 50 -r 40 http://localhost/[siteurl]

This will attempt to make 50 concurrent requests to the website, and will repeat each request 40 times.  This is a total of 2000 requests to each site.

Step 4: Results
Here is the raw data from the tests:

WordPress Concrete5
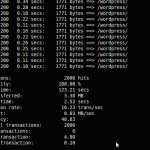
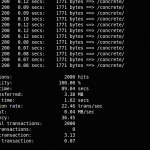
Total Requests: 2000 2000
Average Response Time (seconds): 2.52 1.62
Transactions per second: 16.23 22.46
Longest Transaction (seconds): 4.8 3.13
Shortest Transaction (seconds): .10 .07
Elapsed Time 123.21 89.04

And the corresponding screenshots:

Results for WordPress

Results for Concrete5

a

Step 5: Conclusions
As we can see from the data Concrete5 outperformed WordPress by 20-30% in every measure. This is a significant amount.  What does this tell us?  For small sites with little content, Concrete5 will scale to additional concurrent users better than WordPress. What does this not tell us?  For one thing, the sites may not scale to additional content equally well.  This test also ignored all the static content which will download from either CMS with equal speed.  Finally, WordPress also has some excellent caching plugins that may have closed the gap.

Other Considerations
Am I suggesting you ditch WordPress and port your sites to Concrete?  Not at all. WordPress has many good things going for it; it is the #1 blogging tool and is a finely tuned engine that powers millions of websites.  What I CAN say for sure, is that if you can outperform that, then you’re doing something right.  Hats off to the team at Concrete.

——————————————————-

Update (1 Day Later)
Okay, After posting this, I had a lot of people point out to me that this is not a fair fight.  Concrete has caching enabled by default, and WordPress does not.   After installing wp-super-cache, the elapsed time for 2000 requests from WordPress fell from 123 seconds to 27 seconds.  Wow, crazy plugin.  Either way, my original results stand when you consider out of the box performance.  Wp-super-cache is neither bundled with WordPress nor do it’s version numbers suggest it is stable.  It’s technical options are overwhelming to all but advanced users.  Kudos still go to Concrete5 for integrating a simple, stable caching system into the framework.
Syncing Filezilla Sites across Computers with Dropbox

November 22nd, 2009

I often find myself editing websites on several different computers.  One of the more tedious things is keeping all my FTP settings updated across them.  I’d start development on a new site at work, then try to continue from home, only to find I’d forgotten to write down the connection credentials.  Alternately, even if I did have them on hand, entering them for each FTP client is a waste of time.  Dropbox to the rescue!  Here’s how:

1. Find your site manager file
Filezilla keeps all of your sites and access credentials in an XML file called “sitemanager.xml” Here are the most likely locations:
Windows 7 & Vista – C:\Users\Yourname\AppData\Roaming\FileZilla\sitemanager.xml
Mac OS X – /users/Yourname/.filezilla/sitemanager.xml
Linux – /home/Yourname/.filezilla/sitemanager.xml

2. Back it up
Just in case something goes wrong in the next few steps.  Copy the file and name it something else, perhaps “sitemanager.xml.backup”

3. Move sitemanager.xml to Dropbox
I keep a folder in dropbox called “Settings” which I use for program files that I sync.  Place it where it makes sense to you, just remember that location for the next step.  Note, you want to move the file, not copy it.  It cannot still exist in the filezilla folder, or the next step may not work.

4. Make a soft link from Dropbox back to your Filezilla folder
Filezilla will still look in it’s default place for the sitemanger file.  You’re going to trick it and point it to the file you have snyc’d on Dropbox.  You’ll need to open up a Command Prompt (Windows) or a terminal (OS X/Linux) for this step.  This is what the commands looked like for me, you’ll need to adjust the file paths as necessary.  Note, on Windows, you enter the new link first, then the existing target, and on OS X & Linux, it is the opposite order.

Windows:
mklink “C:\Users\peter\AppData\Roaming\FileZilla\sitemanager.xml” “C:\Users\peter\My Dropbox\Settings\sitemanager.xml”

OS X:
ln -s /users/peter/Dropbox/Settings/sitemanager.xml /users/peter/.filezilla/sitemanager.xml

Linux:
ln -s /home/peter/Dropbox/Settings/sitemanager.xml /home/peter/.filezilla/sitemanager.xml

That’s it!  Fire up Filezilla, and you should see the same site settings now on all of your computers.  Note, if you use “Synchronized Browsing”, you’ll need to create separate bookmarks under each site for each computer, as the local path to your files will be different depending on your computer.

Restore Firefox Tab

November 29th, 2008

Have you ever been browsing with Firefox and accidentally closed a tab that you didn’t mean to? It’s happened to me more than I’d like to admit. The next time it does, Here’s the keyboard shortcut to recover it:

Control + Shift + T ( or Apple + Shift + T)

Easy huh? You’ll like it. I guarantee it.

Setting MP3 Bitrate in Rhythmbox

November 28th, 2008

Rhythmbox is the music player that comes on the default Ubuntu installation. Anyone that has ever used iTunes, Windows Media Player or any other similar program will find it very intuitive. You do need to download an extension to add MP3 capability, but this is easy to do.

What frustrated me for months has been the lack of options for ripping music from CDs. Although it has a great selection of formats (WAV, flac, ogg, mp3) it doesn’t give you any options for setting the mp3 bitrate. At last I found a way, and thought I would pass it on:

Open “Preferences” from the “Edit” menu
Select the “Edit” button to the right of “Preferred Format”
Select “CD Quality, MP3” from the menu and hit “Edit”
Under the “Gstreamer pipeline” field you will find the following:

audio/x-raw-int,rate=44100,channels=2 ! lame name=enc mode=0 vbr-quality=6 ! id3v2mux

To remove the default, remove the vbr-quality=6 statement, and replace it with vbr=0 bitrate=256. This will change it from variable to constant bit rate, and set it to 256 kb/s. You can set it to whatever bit rate you prefer, I like 256. You line should now look like the following:

audio/x-raw-int,rate=44100,channels=2 ! lame name=enc mode=0 vbr=0 bitrate=256 ! id3v2mux

Close the window, and Viola! You’ll now rip CDs at a higher quality