Archive for November, 2009

Syncing Filezilla Sites across Computers with Dropbox

November 22nd, 2009

I often find myself editing websites on several different computers.  One of the more tedious things is keeping all my FTP settings updated across them.  I’d start development on a new site at work, then try to continue from home, only to find I’d forgotten to write down the connection credentials.  Alternately, even if I did have them on hand, entering them for each FTP client is a waste of time.  Dropbox to the rescue!  Here’s how:

1. Find your site manager file
Filezilla keeps all of your sites and access credentials in an XML file called “sitemanager.xml” Here are the most likely locations:
Windows 7 & Vista – C:\Users\Yourname\AppData\Roaming\FileZilla\sitemanager.xml
Mac OS X – /users/Yourname/.filezilla/sitemanager.xml
Linux – /home/Yourname/.filezilla/sitemanager.xml

2. Back it up
Just in case something goes wrong in the next few steps.  Copy the file and name it something else, perhaps “sitemanager.xml.backup”

3. Move sitemanager.xml to Dropbox
I keep a folder in dropbox called “Settings” which I use for program files that I sync.  Place it where it makes sense to you, just remember that location for the next step.  Note, you want to move the file, not copy it.  It cannot still exist in the filezilla folder, or the next step may not work.

4. Make a soft link from Dropbox back to your Filezilla folder
Filezilla will still look in it’s default place for the sitemanger file.  You’re going to trick it and point it to the file you have snyc’d on Dropbox.  You’ll need to open up a Command Prompt (Windows) or a terminal (OS X/Linux) for this step.  This is what the commands looked like for me, you’ll need to adjust the file paths as necessary.  Note, on Windows, you enter the new link first, then the existing target, and on OS X & Linux, it is the opposite order.

Windows:
mklink “C:\Users\peter\AppData\Roaming\FileZilla\sitemanager.xml” “C:\Users\peter\My Dropbox\Settings\sitemanager.xml”

OS X:
ln -s /users/peter/Dropbox/Settings/sitemanager.xml /users/peter/.filezilla/sitemanager.xml

Linux:
ln -s /home/peter/Dropbox/Settings/sitemanager.xml /home/peter/.filezilla/sitemanager.xml

That’s it!  Fire up Filezilla, and you should see the same site settings now on all of your computers.  Note, if you use “Synchronized Browsing”, you’ll need to create separate bookmarks under each site for each computer, as the local path to your files will be different depending on your computer.
Using Custom Profile Field Data in Buddypress Templates

November 18th, 2009

I ran into what I thought would be fairly common need for Buddypress theme development, the ability to pull data from a custom user profile field and display it. After searching a bit, I could only find way to pull either random fields, or all of the fields together. So after digging around in the core files, I found the pieces to put together my own function for the task.

1. Create the file “bp-custom.php” and place it directly in the plugins folder. Note, do not place it in the “buddypress” folder, otherwise it will be overwritten when upgrading. If the file exists, simply append to it rather than creating a new one.

2. Paste the following function in:

function bp_the_site_member_profile_data($field_name = '', $echo = 1) {
  if( !$field_name ) {
    return false;
  }
  global $site_members_template;
  if( function_exists( 'xprofile_get_field_data' ) ) {
    $data = xprofile_get_field_data( $field_name,
                                     $site_members_template->member->id);
    if( $echo ) {
      echo "$data";
      return true;
    } else {
      return $data;
    }
  }
}

3. You can now use the function ‘bp_the_site_member_profile_data(‘MyField’) in your templates (of course, substituting ‘MyField’ with the one you’d like to use). Note, this must be place inside a ‘Members Loop’ so that the $site_members_template variable is populated.  Odds are, you’re inserting this near other profile data already in the loop, so there should be no problems.

UPDATE:
As of BuddyPress 1.2, this functionality has been included. While in the members loop, you can use the included function: ‘bp_member_profile_data( ‘field=the field name’ )’ to much the same effect.

Re-Map Default Mouse Buttons in Ubuntu Karmic

November 9th, 2009

While setting up a new installation of Ubuntu 9.10 for a friend, I ran into a small issue: she was using a 4 button Kensington trackball mouse, and the default key mappings made little sense.  Naturally, there were no drivers or software available, but after some research I was able to figure out how to manually remap the mouse buttons.

Step 1. Find the name of your device.
This step is pretty simple.  Open up a terminal and type in the command:

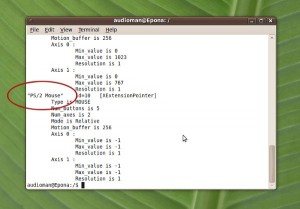
xinput list

This will list all of the input devices recognized by the X window system.  The names are in quotes, and should be pretty self-explanatory; any external mice should be near the bottom.

xinput list

Step 2. Find your button numbers
Each mouse button has a unique number to the system, and your next job is to find out what they are.  In your termal window type:

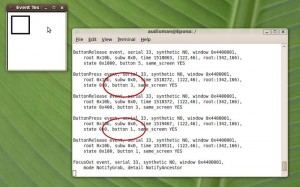
xev

This will open a new smaller window.  Whenever your mouse is over the new window, the terminal will print any input it receives.  This includes both movement and button presses.  For each button on the mouse, press it, and write down what button number it displays.  Don’t forget that scroll up, down, left, and right and wheel click are all treated as different “buttons”.

xev

Step 3. Re-Map the buttons
You can modify your your mappings with the following command (substituting your device name from step 1)

xinput set-button-map "Device Name" 1 2 3 4 5

Running the above command will most likely change nothing, it will map all the buttons to their default functions.  Let’s say your left and right click map to 1 & 3 respectively.  If you wanted to switch them (perhaps for a left-handed user) the command would be:

xinput set-button-map "Device Name" 3 2 1 4 5

In the case of my friend (with a Kensington pro mouse) we needed to swap the 1 & 3 with the 8 & 9 buttons.  That looked like this:

xinput set-button-map "Kensington Pro PS/2" 8 2 9 4 5 6 7 1 3

Note that you can enter as many numbers as you like, up to the number of mouse buttons.  Any numbers you don’t enter will be assumed to be the sequential default.  Thus the following command is equivalent to the one above:

xinput set-button-map "Kensington Pro PS/2" 8 2 9 4 5 6 7 1 3 10 11 12 13

Step 4. Saving your mappings
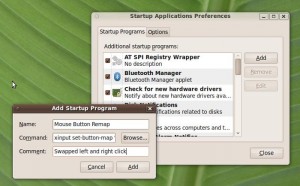
Once you’ve found the correct sequence of numbers, you can have it load automatically by creating a startup item.  Navigate to the following menu:

System > Preferences > Startup Applications > Add

and enter the following:

Name: Mouse Button Remap
Command: xinput “Device Name” 1 2 3 4 5
Comment: “Swapped the left and right click”

Add Startup

Ta Da! You’re Done!